Robocode is a fun programming game that teaches Java by letting you create Java "Robots," real Java objects that battle it out onscreen against other robots. Robocode was developed by Matthew A. Nelson at IBM to help make learning Java more fun. While playing Robocode, you will learn how to write Java code, how to handle events, how to create inner classes, and more.
To use robocode you will need to download and install it from The Robocode website. Once you have installed Robocode, you should run a few battles to see how it works, then move on to build your first Robot. The following is a summary of some of the information you can find on the Robocode homepage.
public class NewRobot extends Robot
{
	/**
	 * run: NewRobot's default behavior
	 */
	public void run()
        {
		// After trying out your robot, try uncommenting the import at the top,
		// and the next line:
		//setColors(Color.red,Color.blue,Color.green);
		while(true)
                {
			// Replace the next 4 lines with any behavior you would like
			ahead(100);
			turnGunRight(360);
			back(100);
			turnGunRight(360);
		}
	}

	/**
	 * onScannedRobot: What to do when you see another robot
	 */
	public void onScannedRobot(ScannedRobotEvent e)
        {
		fire(1);
	}

	/**
	 * onHitByBullet: What to do when you're hit by a bullet
	 */
	public void onHitByBullet(HitByBulletEvent e)
        {
		turnLeft(90 - e.getBearing());
	}

}
while(true) { } means: While the condition "true" is true, do everything between the curly braces { }.
Since true is always true, it means "Do the stuff inside my curly braces, forever"
So this robot will { move ahead 100, spin the gun around, move back 100, and spin the gun around again } over and over and over, until it dies.
When our radar scans a robot, we want to fire:
	public void onScannedRobot(ScannedRobotEvent e)
        {
		fire(1);
}onScannedRobot method whenever you can see another robot.
It sends along an event that can tell us lots of information about the robot -- its name, how much life it has, where it is, where it's heading, how fast it's going, etc.
However, since this is a simple robot, we're not going to look at any of that stuff. Let's just fire!
When our robot is hit by a bullet the game calls the following method:
        public void onHitByBullet(HitByBulletEvent e)
        {
					turnLeft(90 - e.getBearing());
	}
e.getBearing() will give us the Bearing of the bullet that hit us. By turning left
(90 – e. getBearing()) degrees, we will turn 90 degrees from the robot that is shooting at us.
Hopefully, this will allow us to avoid being shot a second time.
 If your Robot is ever going to stand a chance against the other robots, it will need a lot of improvement! To get ideas
on how to improve your Robot, look at the code for the sample robots to see how certain things are done. You can open the
sample Robots in the Robot editor.
You'll eventually want to look at the Robocode API to see all the other things your robot can do. Here are a couple of pointers on Bearing and Heading:
If your Robot is ever going to stand a chance against the other robots, it will need a lot of improvement! To get ideas
on how to improve your Robot, look at the code for the sample robots to see how certain things are done. You can open the
sample Robots in the Robot editor.
You'll eventually want to look at the Robocode API to see all the other things your robot can do. Here are a couple of pointers on Bearing and Heading:
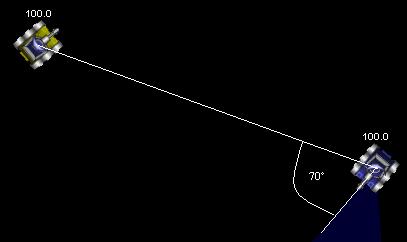
turnRadarLeft(360) to scan the battlefield. In the example to the left,
for the
blue robot e.getBearing() will return 70°. turnRight(e.getBearing());
will always turn your robot so it faces the robot that it scanned.
 The method
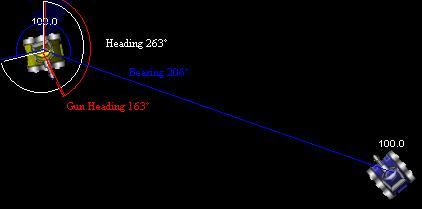
 getHeading() will return the heading of the robot.
Heading is measured in degrees clockwise from north. In the example to the right the Heading of the yellow robot is 263°, and
the Heading of the blue robot is 320°. There is also a getGunHeading() method that will return the heading
of the robot's gun. The heading of the yellow robot's gun is 163°. Since the gun of the blue robot is pointing in the
same direction as the robot, it's gun heading is 320° as well. You can use getBearing(),
getHeading() and getGunHeading() to determine how much to turn your gun. In the picture
above, if the yellow robot turns his gun 306° to the right (or 54° to the left), his gun will point directly at the blue
robot. That way the yellow robot can fire at his opponent while continuing to move in a different (and hopefully safer)
direction.